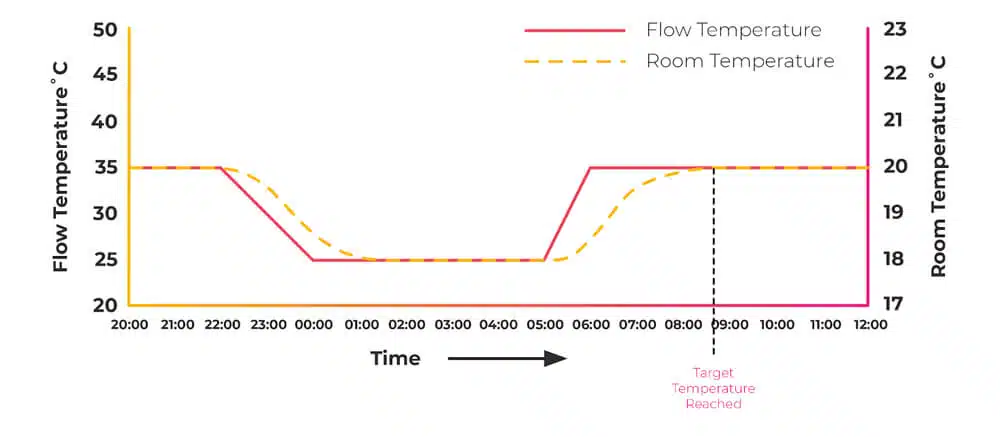
Summary

Key questions about zoning and controls

What’s the difference between room sensors and TRVs?

TRVs limit radiator temperature locally, while room sensors or thermostats control the whole system’s flow temperature.

Does zoning or turning off rooms save energy?

Not usually. Zoning reduces system volume and increases flow temperatures, which lowers efficiency and raises costs.

Why do heat pumps and condensing boilers need consistent flow?

They work best at low, steady temperatures. Interrupting flow makes them cycle more and use extra energy.

What’s the best way to control heating efficiently?

Use modulating or weather-compensated controls with small setback temperatures to maintain comfort and reduce cycling.

Why Not to Zone Heat Pumps or Boilers!

Hi guys, this is a part of one of our modules from our Heat Geek online heating design training course.

Please bear in mind, this is very much from the advanced section. All the trainees who would have reached this part would have already done all the maths necessary to understand exactly what’s going on here. However, we’re just going to explain what's happening.

Room Sensor vs TRVs

Restricting the room temperature with a thermostat or TRV (thermostatic radiator valve) prematurely is like braking and accelerating at the same time.

If using room compensation, the TRV or room thermostat closes down prematurely because it is out of sync with this room sensor, which can happen over time. The room influence controller will increase the target flow temperature at the heat source to compensate, and the two conflicting temperature controls will fight. This is why it is set up more like a temperature limiter rather than a control.

With pure open-loop weather compensation, it's more about keeping the flow rates up and allowing the self-regulation effect.

Thermostatic Radiator Valves

TRVs are slightly better than room stats, as these operate within a control band. They slowly close down as they reach the target temperature.

They don't just close down immediately and can sit in a semi-closed position to allow flow through.

Modulating Controls

This first section essentially says that we want to use modulating controls for our heat sources.

That control varies the flow temperature from the heat source, not just switching it on or off.

These dramatically increase the efficiency of heat pumps and a bit in boilers. For more information on smart stats, have a look at our smart stat video.

We wouldn't necessarily advise using TRVs or room stats to turn down unused rooms or spare rooms either. Turning unused rooms right down, or micro-zoning, gives a particularly high risk of losing efficiency for heat pumps.

Creating too many zones in our system restricts the system volume and increases cycles, but most importantly, it increases the flow temperature required.

Flow Temperature

Okay, this is a key point to understand throughout the whole of this article:

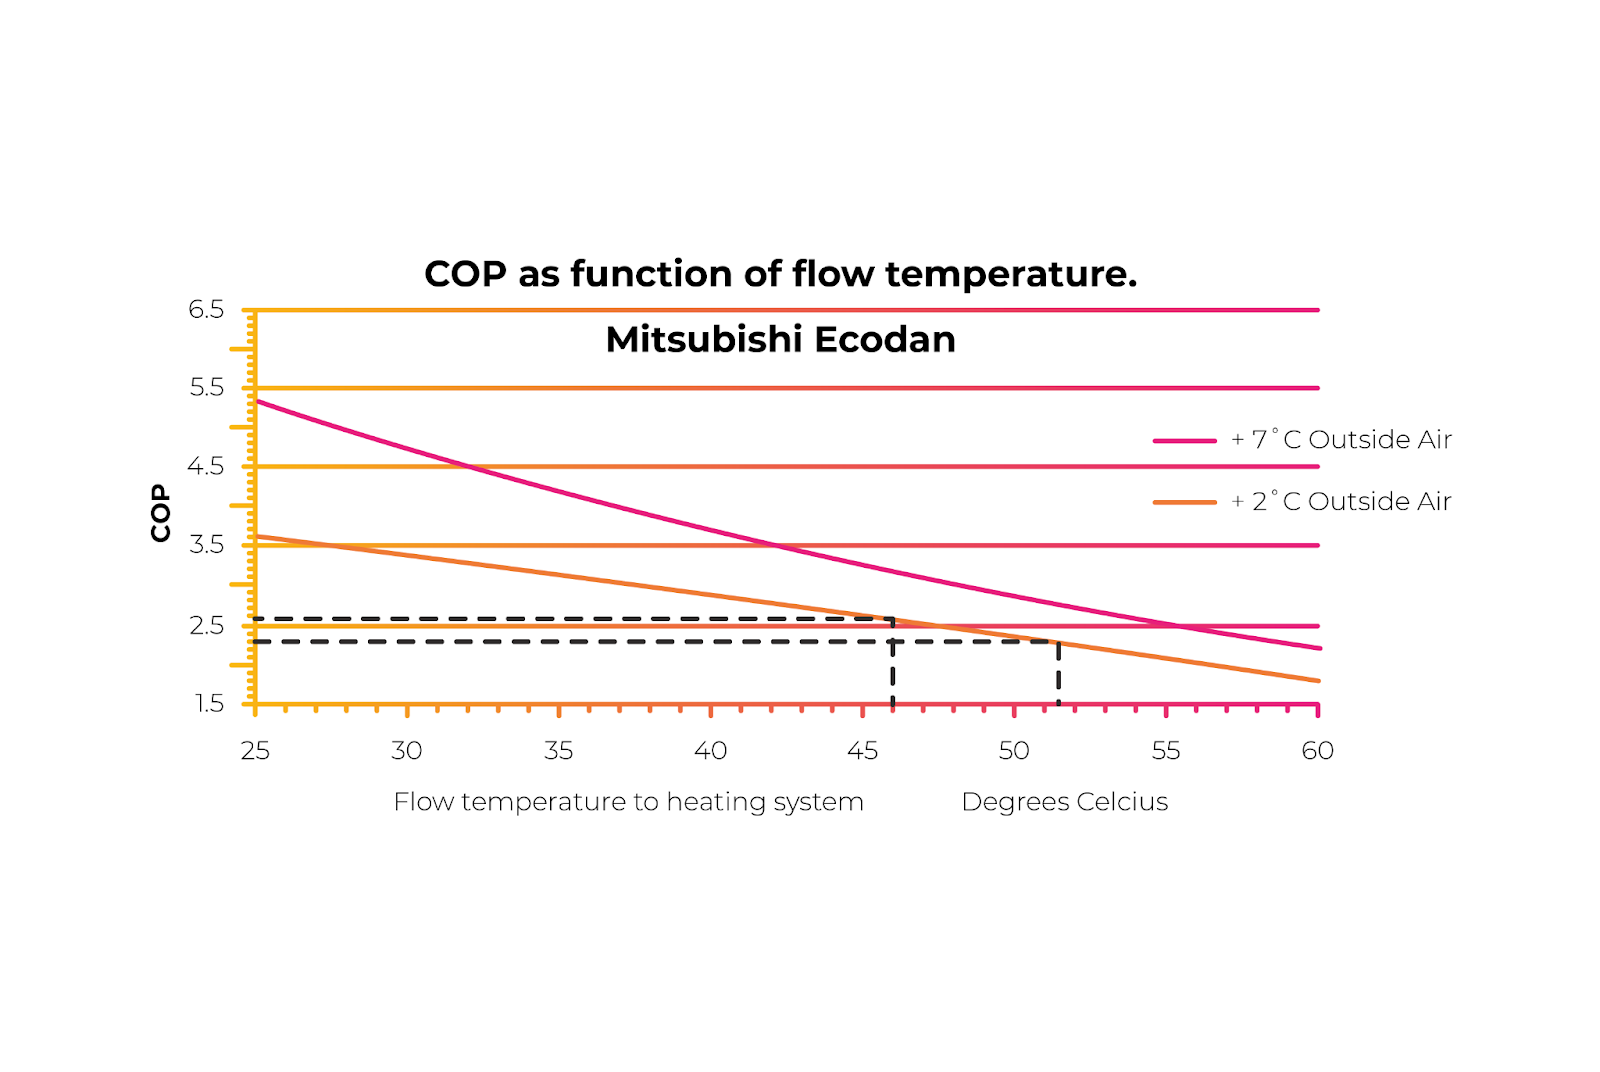
The lower the flow temperature inside your heat source, heat pump, or gas boiler, the more efficient it is.

We want to target as low a temperature as possible. By maximising the surface area of our emitters, we minimise our flow temperature.

Closing down radiators effectively reduces the surface area available to emit heat. The remaining radiators that are still on will have to run much hotter to compensate for the colder rooms next door. Here's an example we can work out together.

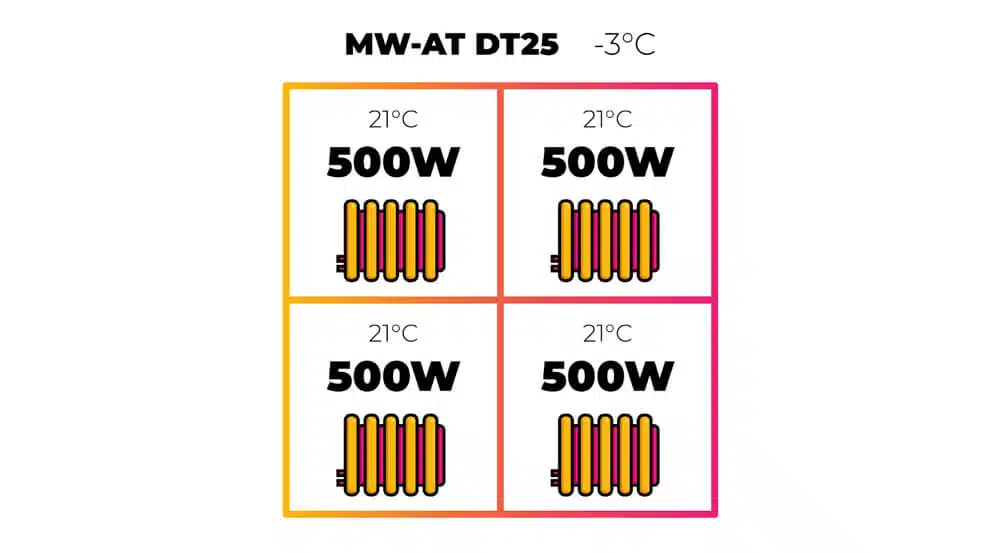
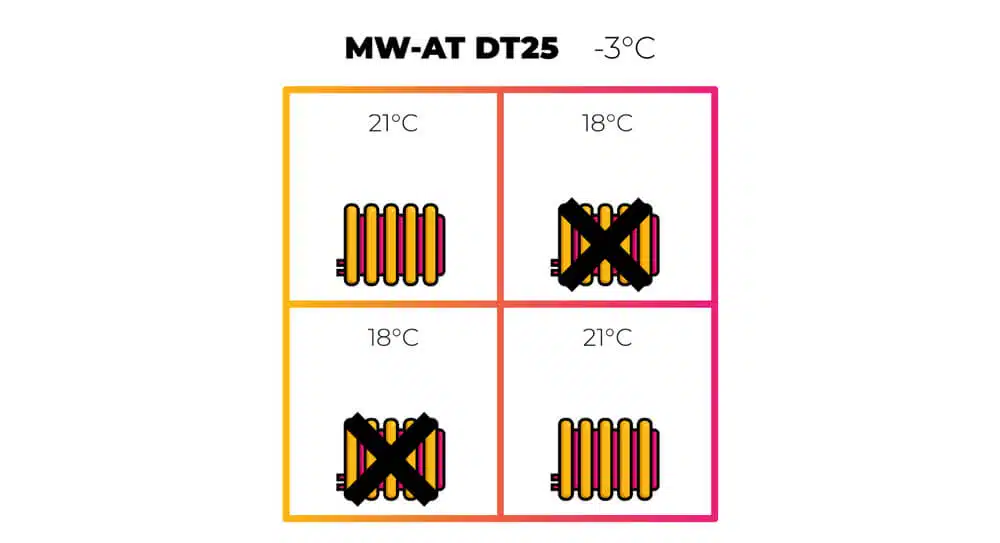
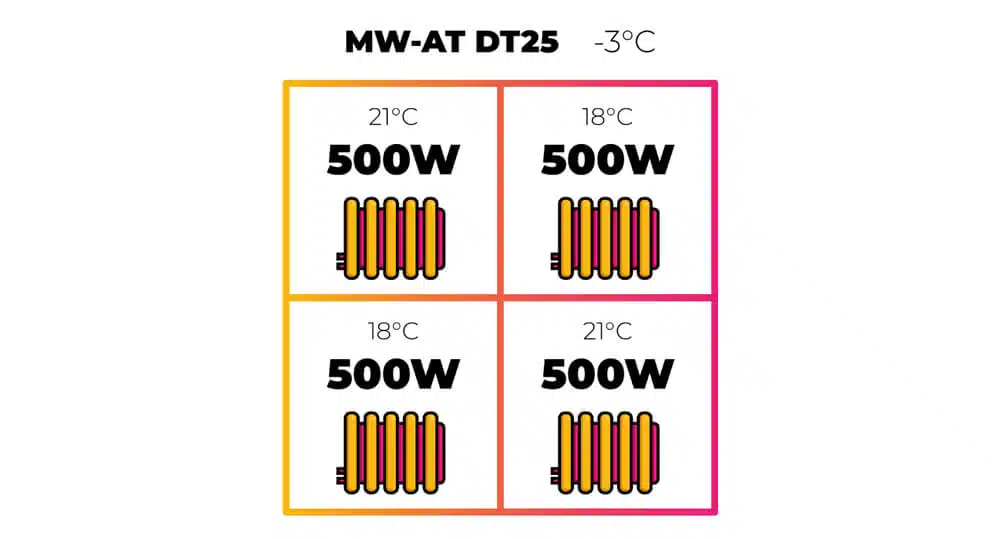
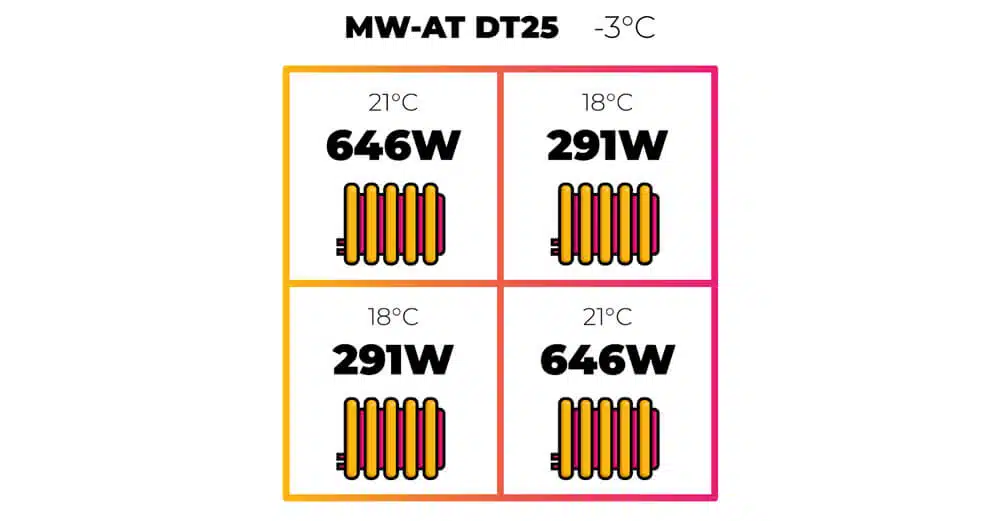
Let's take this four-room house. To keep the maths simple, each room has a 500 W heat loss at design outside temperature of −3 °C — or 2 kW in total — with a room temperature of 21 °C. Each room is fitted with a mean water-to-air temperature (ΔT 25) radiator, meaning each radiator will output 500 W when its average surface temperature is 25 °C above the room temperature.

Now, let’s say you don't use two rooms, so you put them into a setback temperature of 18 °C to save energy.

A quick way to see how much heat loss this saves is by working out how much power the property takes to heat by 1 K (at design temperature) multiplied by our new average property temperature.

The property originally had a heat loss of 2 kW with ΔT 24 K:

500 × 4 = 2000 W (2 kW heat loss at ΔT 24)

This means it will require 83.3 watts per kelvin (2000 ÷ 24 = 83.3 W/K).

The new average temperature of the building is 19.5 °C, which would make our new ΔT 22.5 K:

(21 + 21 + 18 + 18) ÷ 4 = 19.5 °C (19.5 − (−3) = ΔT 22.5)

Multiply these together and you’ll see that the new load would theoretically be 1874 W if all rooms had similar heat loss.

22.5 × 83.3 = 1874 W

That’s 6.3 % less energy loss.

Heat Loss

This could be looking from above or a side view; it doesn't really matter. Turning down our radiators in the unused rooms to 18 °C in this specific scenario has saved 6 % heat loss from the property, which sounds great — or does it?

Remember, that's only if your other rooms actually drop to 18 °C, while the others remain at 21 °C. This is quite possible if you have solid, uninsulated external walls. But for any building with cavity walls or cavity insulation, even if your internal doors are permanently shut, it’s unlikely that the temperature difference will hold. Internal doors and walls are rarely fully insulated or sealed.

Let's say those rooms with a setback temperature of 18 °C only drop to 19 °C. Let’s work out the total heat loss from that building.

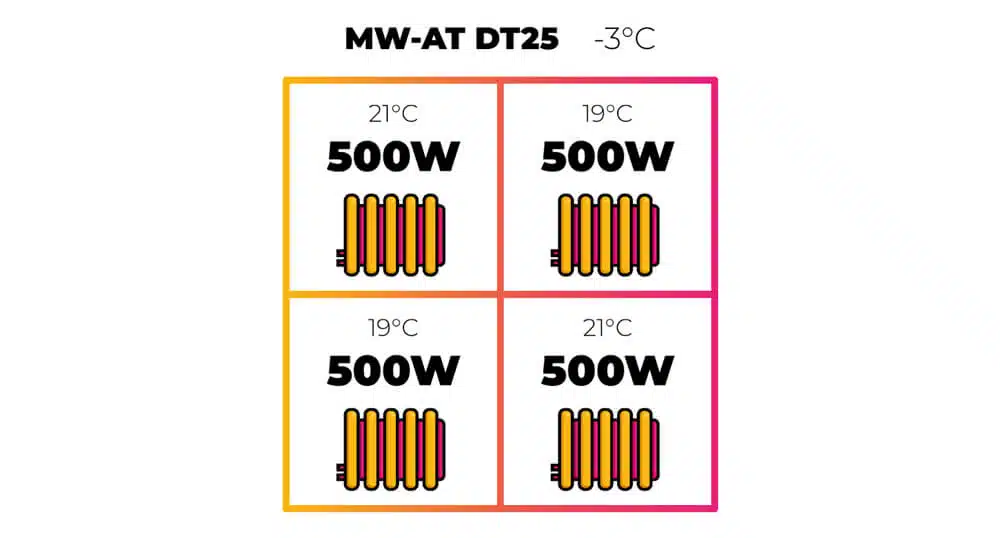
If we add all our room temperatures together and divide by 4, this gives us a mean temperature of 20 °C:

(21 + 21 + 19 + 19) ÷ 4 = 20 °C (20 − (−3) = ΔT 23)

If the building has a heat loss of 83.3 W/K, multiply this by ΔT 23 to give 1916 W heat loss.

23 × 83.3 = 1916 W

That’s a 4.2 % less energy loss.

So we’ve saved 4.2 % power or energy. But because heat is still lost into those cooler rooms, your total heat loss isn’t as low as you might expect from turning down those TRVs.

Yes, your radiators in those rooms aren't on, but the other remaining radiators are having to work much harder to heat their rooms, so the result is that you could actually only be saving 4 %.

Now remember, the property was fitted with ΔT 25 radiators, meaning they output 500 W when their average surface temperature is 25 °C above the room temperature. What temperature do you think these same radiators would have to be if the adjoining rooms were 18 °C?

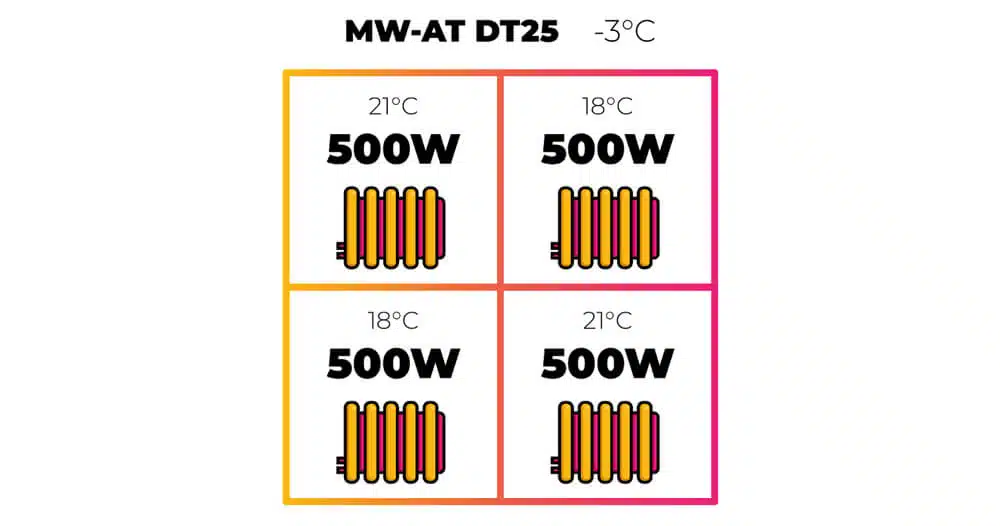
Let's say each internal wall is 2.3 m by 4 m and each room has a 2 m² door.

Internal Wall Area: 2.3 × 4 with a U-value of 2 W/m²K

Internal Door Area: 2 m² with a U-value of 8 W/m²K

We first work out the heat loss into adjoining rooms. 2.3 × 8 (for both walls) = 18.4 m².

2.3 × 8 = 18.4 m²

Subtract 2 m² for the door → 16.4 m². Multiply by U = 2 W/m²K → 32.8 W/K. Multiply by 3 K difference → 98.4 W heat loss through walls.

32.8 × 3 = 98.4 W

Now add the door: 2 m² × 8 W/m²K = 16 W/K. Multiply by 3 K = 48 W through the door.

16 × 3 = 48 W

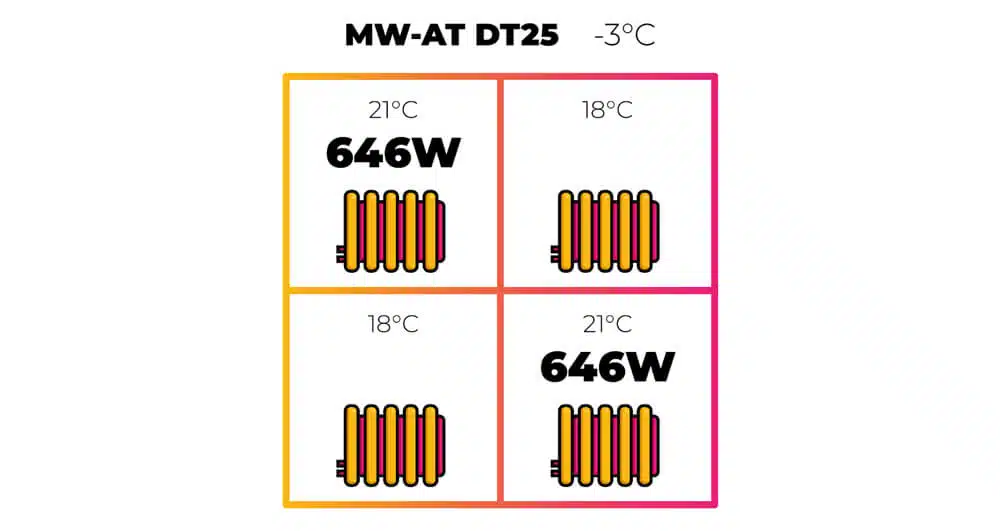
Total = 98.4 + 48 = 146.4 W heat loss from each 21 °C room into the cooler rooms.

So the ΔT 25 radiator, which produces 500 W, now has to output 646.4 W (500 + 146.4).

If you remember, the property required 1874 W total. If these two radiators are outputting 1292 W, the remaining 582 W will be emitted into the two cooler rooms by their respective radiators, whose TRVs may be almost closed or pulsing heat on and off.

To calculate the temperature required to make a 500 W (ΔT 25) radiator output 646 W, rearrange our radiator conversion factor using the previous principles from the course.

First, determine the increase: 646 ÷ 500 = 1.292 → a 29.2 % more power required from the radiator.

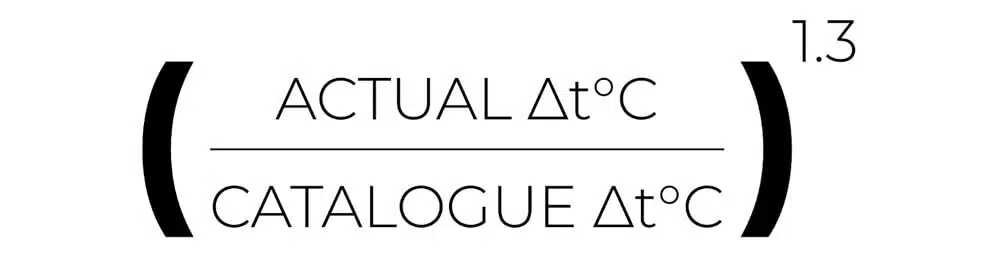
We now have to account for the non-linear relationship between MW-AT and the heat output of radiators, which you might remember features an exponent of 1.3,. However, we're working the other way around here. So rather than going from ∆T difference to the power increase, we're going from the power increase to the ∆T. So we'll have to use the reciprocal of 1.3.

Remember to find the reciprocal, we divide the number 1 by the number we want to find the reciprocal of: 1 divided by 1.3 is 0.77.
1 ÷ 1.3 = 0.77

We take our 1.292 power increase to the power of 0.77, which gives 1.22 rounded up.
1.292^0.77 = 1.22

Your radiator’s mean water-to-air temperature will have to be 1.22. That's 22% hotter to output 614 W. So if the mean water-to-air temperature ∆T was previously 25°C, the new mean water-to-air temperature will have to be 30.5°C.
25 K x 1.22 = 30.5°C

Now, with a 21°C room temperature, our mean water temperature would have been 46°C at the design outside temperature. However, it will now need 51.5 degrees celsius.

Old mean water temperature = 46°C (21°C room temp + ∆T 25)

Heat Pump Efficiency

Essentially, the point here is that by turning down or off zones, the remaining zones will have to run much hotter — and with a heat pump, that directly means higher fuel bills.

Take a look at this COP graph for a Mitsubishi Ecodan heat pump. Remember, this lower line is for 2 °C outside temperature, but let's use it as an example.

If you run the house with all the zones open and at the same temperature of 21 °C, you would need a flow temperature of around 46 °C (depending on the system’s ΔT). That would give you a COP of 2.6.

This would consume 769 W of electricity to produce 2 kW of power from the heat pump:

2000 ÷ 2.6 = 769 W

If you zoned down the property to a heat loss of 1874 W, but had to run at the new flow temperature of 51.5 °C (again depending on ΔT), the COP would drop to 2.3.

Using the same COP calculation:

1874 ÷ 2.3 = 815 W

That’s 6 % more power required, despite the property requiring 6.3 % less heat. This aligns closely with the rule of thumb: for every 1 K hotter the heat pump has to run, you lose around 2.5 % efficiency.

This clearly shows that zoning isn’t necessarily a good idea. The efficiency curve for gas heating isn’t quite as steep, but it still exists and should be considered when choosing setback temperatures or how much to zone.

Gas Boiler Efficiency

Take a similar situation but using a gas boiler. If you reference the same graph, you’ll see that you could save approximately 4 % efficiency with these flow temperatures or even up to 12 % efficiency under different flow conditions.

The complication with gas boilers comes from part-load efficiency. The lower the output of the gas boiler, the higher the efficiency — but we won’t go into that today.

Let’s take this one step further and assume the two off rooms in our earlier example were turned completely off to frost setting at the TRV, while the other two stayed at 21 °C. Assume the “off” rooms settled at 18 °C. What mean water-to-air temperature would these radiators now require, remembering the property heat loss is 1874 W?

Each radiator would now need to emit 937 W:

1874 ÷ 2 = 937 W

937 ÷ 500 = 1.87, so the radiators need 87 % more power.

937 ÷ 500 = 1.87

Now apply the 0.77 exponent (reciprocal of 1.3):

1.87^0.77 = 1.62

Our previous ΔT 25 radiators will now need to run at ΔT 40.5.

25 × 1.62 = 40.5 °C

If the room temperature is 21 °C, the mean water temperature will now need to be 61.5 °C, giving a flow temperature of roughly 64 °C. This isn’t possible for most standard heat pumps.

Required flow temperature: 64 °C (mean 61.5 °C)

Heat Pump Efficiency

In this example, by completely turning off zones or radiators, the heat pump COP drops from 2.6 to 1.6 — that’s 52 % more power usage even though the property is losing 6 % less heat.

In real-world terms, if electricity costs 15p/kWh, this 2 kW home at full load (all rooms at 21 °C) costs 11.5p/hour to run. Once two rooms are turned down to 18 °C, the cost rises to 18p/hour — despite those two rooms being cooler!

And not only will this hurt efficiency and fuel bills, the 21 °C rooms won’t be able to reach temperature at all.

Now, this isn’t to say you should never zone. There are many variables like building shape, layout, system mass, and other heat sources to consider.

However, we’ve been generous to zoning in these calculations. Particularly with heat pumps, zoning increases one other major inefficiency that’s often overlooked: increased cycling.

Due to built-in anti-cycling, gas boilers have only minimal losses from cycling. However, heat pumps have considerable losses at startup.

Heat pumps don’t reach maximum efficiency immediately. The compressor must increase pressure enough to evaporate the refrigerant and begin the cycle.

At startup, the compressor is inefficient. It then slowly climbs to peak efficiency — and the longer it runs at this state, the higher the average COP. If the unit switches off too early, this advantage is lost, and overall efficiency drops.

The compressor is also most efficient at maximum output. When compressor speed slows, its efficiency falls again.

There are two ways to ensure a heat pump stays efficient:

Advanced controls often have adjustable minimum run times or cycle rates built in, but you can’t adjust these indefinitely without side effects. The wider the time between on/off cycles, the wider your room temperature swings.

The narrower the cycles, the steadier the temperature — but with less efficiency.

Additionally, zoning reduces volume, which widens overshoot and undershoot temperature swings. This again leads to more cycling and less efficiency.

Advanced Controls

So, increasing the flow temperature is one factor, but turning off radiators or underfloor heating zones also increases cycling — the switching on and off of the appliance. This loss in efficiency is in addition to the reduction we already calculated.

The advanced controls built into high-quality heat pumps and high-end boilers are something you’ll need to understand and get used to. They are specific to each manufacturer and include a wide range of adjustable parameters to suit particular preferences and property types.

Using a third-party control to send an on/off signal to these heat sources and bypass their built-in functionality can seriously harm efficiency and COP (Coefficient of Performance).

If you do use third-party controls, you’ll need to set a higher-than-necessary weather compensation curve to make up for the more intermittent heating. Because energy is lost from the building continuously, the heat source has to work harder when switched back on.

This is why you may hear engineers say you should leave your heat pump “on all the time”. However, this doesn’t mean constantly running at full temperature. You can and should use an “off” temperature — more accurately known as a setback temperature.

Setback Temperatures Explained

With advanced weather compensation, rather than turning the heating system completely off at night, the system drops to a setback temperature.

Let’s say it’s 9 °C outside. Your target room temperature is 20 °C and your heat pump flow temperature is 35 °C.

If you have pure weather compensation, the system will reduce flow temperature to what’s needed for your setback — say, 18 °C — which might correspond to a flow temperature of 28 °C.

Because the system and the property are still warm, the heat pump will cycle off for a while as things cool, then re-fire to maintain around 28 °C. If the curve is set accurately, the property will stabilise at 18 °C and no lower.

This keeps the property’s walls, pipework and thermal mass supplied with energy, maintaining a stable equilibrium.

If you turned your system completely off, the internal temperature could fall much lower than 18 °C, meaning the heat pump would need to start again at much higher temperatures to recover. That would take longer and cost more energy.

Once the schedule returns to 20 °C, the system can heat up efficiently since it never fully lost its thermal mass energy. The flow temperature can stay lower, keeping efficiency high.

Any closed-loop or room-influence control can work against this approach, as it overrides the gradual modulation of flow temperatures. There isn’t one single rule for all systems, but generally speaking, this explains why experts advise a minimal setback range.

For gas boilers, the setback temperature should typically be no more than 3 °C below the comfort temperature, and for heat pumps, no more than 2 °C below. This maintains the property’s thermal mass while keeping flow temperatures as low as possible.

Of course, this can vary depending on insulation, building layout and system type — particularly thermal mass and emitter size.

The Recap

So, to recap — heat pumps in particular need a high system volume to run effectively and efficiently, unless your property has better internal insulation than external insulation.

Installing zone controls may have the opposite effect to what’s intended. While zoning might sound like a great idea for saving energy, in practice it often reduces efficiency by increasing cycling and flow temperatures.

You can reduce cycling by installing buffers or low-loss headers, but these have downsides too — extra cost, more space required, and their own efficiency losses. You can watch our video on low-loss headers to see exactly how this works.

There are situations where zoning is appropriate, but every building is different. It depends on layout, system design, insulation levels, and user behaviour. That’s why a one-size-fits-all rule (or even some British Standards) doesn’t always produce the best results. Each property requires an engineered, case-by-case approach.

And if you’re an engineer yourself and want to learn more about how to design, install and optimise low-temperature systems properly, head over to heatgeek.com. Don’t worry about all the maths – our training builds you up step by step, with 24/7 support from like-minded professionals.